chorus effect by julien bitoun

Understanding the Chorus Guitar Effect for Beginners

Key Takeaways

  • Chorus is a modulation effect that adds a detuned voice to your original signal, creating a richer and fuller sound.
  • Control settings vary between pedals, with some offering just a rate knob while others provide depth and intensity adjustments.
  • Lower rate settings produce a subtle, lush effect, while higher settings create a more pronounced wobbling or vibrato-like sound.

What Is the Chorus Effect? The Sound of Depth and Motion

The chorus effect is one of the most widely used modulation effects in guitar playing. It works by duplicating your original signal, slightly detuning it, and modulating the pitch to create a thicker, more spacious tone. The result? A shimmering, swirling sound that can range from a subtle widening of your tone to a pronounced wave-like motion.

This effect became iconic in the 80s, shaping the lush clean tones of bands like The Police and the ethereal textures of The Cure. But its origins go even further back. Just listen to the arpeggios in Nirvana’s Come As You Are or the expansive clean intros of Metallica. Chorus isn’t just about enhancing a sound; it adds character, depth, and movement to an otherwise static signal.

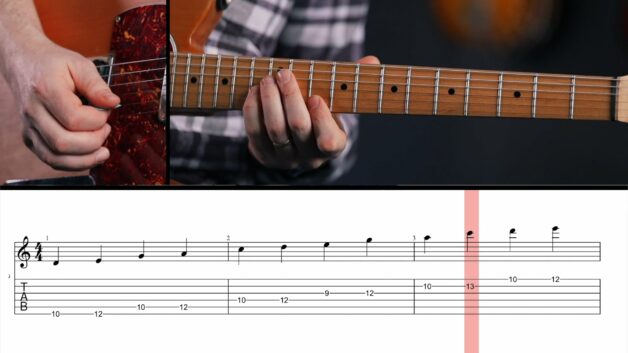
How to Use a Chorus Pedal: Finding Your Sweet Spot

Most chorus pedals come with a few essential controls. The most common one is Rate, which adjusts the speed of modulation:

  • Lower rate settings result in a slow, smooth modulation, perfect for adding warmth and subtle movement.
  • Higher rate settings introduce a warbling, almost seasick effect reminiscent of vibrato.

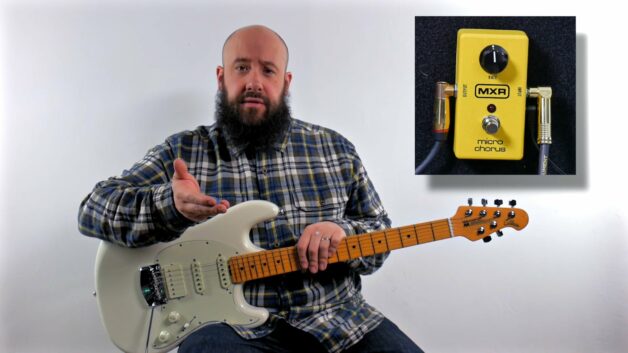
Some pedals also include a Depth or Intensity knob, allowing you to adjust how prominent the effect is in your signal. If your pedal lacks these controls, like some simpler MXR models, the settings are fixed, which means you’ll need to work with the rate control to shape your tone.

Common Mistakes: Why Does My Chorus Sound Muddy?

Many beginners fall into the trap of overusing chorus, thinking more is better. But too much depth or too high a rate can result in a tone that sounds overly processed or artificial. If your sound starts to feel washed out or unclear, try backing off the effect and balancing it with your core tone.

Another common mistake? Using chorus with high-gain distortion. While it can work in specific situations (think Zakk Wylde’s lead tone), too much chorus on an already saturated signal can lead to a muddy, indistinct sound. If you’re playing with crunch or overdrive, keep the depth lower for a more natural blend.

Pro Tips for a Great Chorus Sound

  • Use chorus subtly on clean tones for a warm, lush effect which is great for rhythm parts or melodic passages.
  • Experiment with stacking effects: pairing chorus with delay and reverb can create an immersive, three-dimensional sound.
  • Try stereo chorus setups: if you have two amps, running a chorus pedal in stereo can create an even wider, more enveloping sound.
  • Keep an ear on your mix: chorus can add magic, but too much can make a track feel cluttered.

Start Exploring the Chorus Effect Today!

Mastering chorus is all about finding the balance that fits your playing style. Whether you’re after the subtle shimmer of John Frusciante’s cleans or the wavy, psychedelic textures of The Smashing Pumpkins, experimenting with different settings will help you shape your unique sound. Take your time, tweak your settings, and most importantly: trust your ears!

phaser effect by julien bitoun

Understanding the Phaser Guitar Effect

Key Takeaways

  • The phaser effect shifts the phase of a sound, creating a dynamic, sweeping modulation.
  • Simple phasers like the Phase 90 have only a speed control, while others offer more depth and intensity settings.
  • Lower speeds create subtle movement, while higher speeds mimic a fast, rotating speaker effect.
  • Placement in the signal chain and interaction with other effects impact the final sound.

What is a Phaser and How Does It Work?

Some effects shape tone, others add texture, and then there’s the phaser, a modulation effect that gives your guitar a distinctive, swirling motion. It works by splitting your signal, shifting one part out of phase, and blending it back, producing a characteristic rise and fall in sound.

The phaser became widely recognized in the 1970s, making its way onto classic records like Van Halen’s “Ain’t Talkin’ ‘Bout Love” or Pink Floyd’s “Shine On You Crazy Diamond”. While it’s often associated with rock and psychedelic music, it’s a versatile effect that finds its way into funk, blues, and even metal.

Simple vs. Advanced Phaser Pedals: What You Need to Know

Some phasers, like the legendary Phase 90, keep things simple with just one knob called speed. At low settings, the modulation is slow and subtle, adding just a hint of movement. Crank it up, and you get a fast, almost rotary speaker-like effect that stands out in a mix.

More advanced models introduce additional controls:

  • Depth (or intensity): Adjusts how pronounced the effect is.
  • Stages: Determines how many phase-shifting points exist in the circuit. More stages create a richer, more complex tone.
  • Resonance (or feedback): Feeds some of the processed signal back into itself, enhancing the effect.

For beginners, sticking with a simple phaser can be a great way to start. There’s no need to overcomplicate things, just plug in and experiment.

Dialing in the Right Phaser Settings

Guitarists often struggle with modulation effects because they can easily overpower the natural tone of the instrument. The key is to find the right balance:

  • For rhythm playing: A slow phaser setting adds movement without being distracting. Think of Eddie Van Halen’s approach. He used a subtle phase effect to thicken clean parts and riffs without making them too dominant.
  • For lead lines: A slightly faster speed can create a dramatic, spacey effect that helps notes stand out.
  • For experimental sounds: Cranking the speed to higher settings results in a warbling, almost synth-like effect. Some players combine this with delay for an even more pronounced atmospheric tone.

It’s also important to consider where you place the phaser in your signal chain. Generally, phasers work best before distortion if you want a smoother, organic sound. Placing it after distortion creates a more pronounced, aggressive sweep.

Avoiding Common Phaser Mistakes

New players often make the mistake of overusing the phaser effect. While it’s tempting to leave it on all the time, too much modulation can make your tone feel unnatural or muddy. Instead, try using it strategically. Perhaps only on certain parts of a song, like a chorus or a solo section.

Another common issue is dialing in too extreme a setting. If you’re struggling to find a usable tone, start with a moderate speed and minimal depth, then gradually increase until you find the sweet spot.

Explore the Phaser Sound

The phaser guitar effect is one of the easiest modulation effects to experiment with, yet it offers a wide range of tonal possibilities. Whether you’re going for a classic vintage vibe or pushing into experimental territory, understanding how to tweak its settings will help you unlock its full potential. Try different placements, pair it with other effects, and most importantly, listen to how it interacts with your playing style.

overdrive effect by julien bitoun

Overdrive Guitar Sound and Effect: Unlocking Classic Tones

Key Takeaways

  • Overdrive pedals mimic the warm saturation of a cranked-up tube amp.
  • The GT-OD by MXR follows the tradition of the Ibanez Tube Screamer, boosting mids for better mix presence.
  • Three essential controls (output level, tone, and gain) shape the overdrive character.
  • Overdrive enhances an amp’s natural tone without pushing it into full distortion.

The Essence of Overdrive: More Than Just Gain

If you’ve ever wondered how guitar legends like Stevie Ray Vaughan or Eric Clapton achieve their rich, dynamic tones, the answer often lies in overdrive. Unlike distortion, which drastically reshapes the sound, overdrive works with your amp, enhancing its natural response. It’s not just about adding gain, it’s about control, feel, and warmth.

The GT-OD by MXR is a modern classic, inspired by the Ibanez Tube Screamer, one of the most beloved overdrive pedals of all time. These pedals excel at pushing an amp just enough to make it sing, especially in blues and rock contexts. The key to their magic is the midrange boost, which ensures your guitar cuts through a mix without overpowering other instruments. This is why you’ll see overdrive pedals on the pedalboards of everyone from jazz players to metal guitarists looking for a tight lead tone.

Mastering the Controls: Small Tweaks, Big Impact

One of the biggest mistakes beginners make with overdrive is assuming that turning up the gain is the only way to get a better sound. In reality, balance is everything. Here’s how the three core controls work:

  • Output Level: This controls the volume of the pedal’s signal. Many players use it to push their amp harder rather than relying on the pedal’s gain.
  • Tone Knob: A crucial setting that adjusts the brightness or darkness of your sound. Too much treble? Dial it back. Too muddy? Brighten it up.
  • Gain Control: Determines how much overdrive is added. At lower settings, it acts as a subtle boost. Turn it up, and you’ll get a full-bodied, saturated tone.

Many experienced players set the gain low while boosting the output. This method keeps the amp’s character intact while adding sustain and presence. Ideal for classic rock or blues solos. Conversely, increasing gain and lowering output works well for a saturated rhythm tone.

Getting the Most Out of Your Overdrive

Finding your perfect overdrive setting isn’t just about the pedal, it’s about your amp, guitar, and playing style. Here’s how to dial in the best sound:

  • For a clean boost, keep the gain low and increase the output. This technique is widely used in blues and country to add a bit of warmth without breaking into full overdrive.
  • For a balanced overdrive tone, start with everything at noon and make small adjustments. The sweet spot often depends on your amp’s natural breakup point.
  • For a high-gain push use the overdrive to tighten up a distortion channel rather than stacking too much gain.

One thing to watch out for: muddy tone. If your sound loses clarity, try rolling back the gain slightly or increasing the tone control to bring out definition. A common issue for beginners is setting everything too high, leading to a washed-out, indistinct tone.

Overdrive and the Art of Touch

What makes overdrive pedals unique is how they respond to playing dynamics. Unlike heavy distortion, which can compress your sound, overdrive preserves nuances. Light picking produces a cleaner sound, while digging in brings out natural grit. This is why many legendary blues and rock players rely on overdrive. It doesn’t replace expression, it enhances it.

So, whether you’re trying to replicate the soulful tones of John Mayer or push your amp just a little harder, overdrive is an essential tool. Start tweaking, listen closely, and find the setting that makes your guitar sing!

Changing guitar strings (acoustic, electric and classical guitar) by hubert boulogne

How to Change Your Guitar Strings: Essential Guide for Beginners

Why Changing Strings is a Must for Every Guitarist

Guitar strings don’t last forever. Over time, they lose their brightness, go out of tune more frequently, and even start to feel rough under your fingers. If you’ve ever wondered why your guitar sounds dull even after tuning, worn-out strings might be the culprit. Regularly changing them ensures a clear, vibrant tone and a more enjoyable playing experience.

Learning to change your own strings is also a fundamental skill for any guitarist. Whether you’re playing classic rock like Led Zeppelin, intricate fingerstyle pieces, or simple open chord progressions, fresh strings make all the difference. While it might seem intimidating at first, the process is straightforward once you understand the basics.

Step-by-Step Guide to Changing Your Guitar Strings

Removing the Old Strings: Slow and Steady Wins the Race

Start by loosening each string using a string winder. Turn the tuning peg clockwise until the tension is loose enough to cut the string safely. Some players remove all the strings at once, but it’s generally better to replace them one at a time to maintain neck tension. This is particularly important for acoustic guitars, as sudden changes in tension can slightly shift the bridge setup.

Once the string is slack, cut it using a string cutter, then unwind it from the tuning peg. For acoustic guitars, you’ll also need to remove the bridge pin using a peg puller. Be gentle to avoid damaging the bridge. If the pin feels stuck, wiggling it slightly before pulling can help.

Installing the New Strings: The Right Amount of Slack Matters

Pick the appropriate string from your set. The low E string (typically .052 gauge or similar) is the thickest, while the high E string is the thinnest. Insert the string into the bridge pin hole, ensuring that the groove of the bridge pin faces the string. Press the pin down firmly and pull the string slightly to secure it.

At the tuning peg, align the post hole so that it faces the guitar neck. Thread the string through and leave some slack. Generally, one to two machine head lengths depending on the string gauge. Thicker strings require less slack, while thinner ones need a bit more. Too little slack results in unstable tuning, while too much leads to messy winding.

Wind the string from top to bottom of the tuning peg, using a string winder for speed. Applying light pressure on the string while winding helps seat it properly. Make sure the coils wrap neatly and don’t overlap, messy winding can cause tuning instability.

The Crucial Last Step: Stretch and Tune for Stability

Once your string is wound and tuned up, you’re not quite done. New strings tend to stretch, leading to frequent detuning. To speed up the settling process, stretch the string gently by pulling it upwards at various points along its length. Tune it back to pitch, stretch it again, and repeat the process a couple of times until the tuning stabilizes.

When all strings are installed, play a few chords to get a feel for the new strings. You may need to retune a few more times before they hold their pitch consistently.

Common Mistakes to Avoid

  • Skipping the stretching step: Your guitar will constantly go out of tune if you don’t stretch the strings properly.
  • Leaving too much slack before winding: This results in messy coils and unstable tuning.
  • Not pressing the bridge pin securely: If it’s loose, the string can slip out while tuning.
  • Cutting excess string too soon: Always ensure the string is stable before trimming the excess.

Keep Your Guitar Sounding Fresh

Changing your strings might feel like a chore at first, but once you get the hang of it, it’s a quick and rewarding process. Whether you’re playing blues licks, pop chords, or shredding metal solos, fresh strings will make your playing more enjoyable and your tone more expressive. If you’ve never done it before, take your time, follow the steps carefully, and soon enough, you’ll be stringing up like a pro.

tempo by dan holton

Understanding Tempo: A Key Element in Learning Guitar

The Foundation of Rhythm: Why Tempo Matters?

If you’ve ever tapped your foot to a song, you’ve already engaged with tempo. Whether it’s the slow groove of a blues classic like The Thrill Is Gone (around 60 BPM) or the rapid fire of Master of Puppets (pushing past 200 BPM), tempo shapes the feel of every piece of music.

For guitarists, mastering tempo isn’t just about playing fast or slow, it’s about control. Many beginners struggle with consistency, either rushing through tricky sections or dragging behind the beat. This is where a good sense of BPM (beats per minute) becomes crucial.

Key Takeaways: Understanding and Applying Tempo

  • Tempo is measured in BPM (beats per minute), defining the speed of a song.
  • A metronome helps build timing precision and consistency.
  • Playing different note values (eighth notes, sixteenth notes) can change the perceived speed.
  • Counting in before playing improves coordination with other musicians.

Building a Strong Sense of Tempo: Practical Tips

A metronome is one of the most effective tools for developing a reliable sense of rhythm. Professional musicians rely on it to refine their timing, and it’s an essential companion for beginners. If you’re learning a pentatonic scale, start by playing it at a comfortable speed (say 70 BPM) and gradually increase the tempo as your accuracy improves.

One common mistake beginners make is trying to speed up too soon. Playing fast but sloppily is counterproductive. Instead, focus on clean execution at a slower tempo, and only push the BPM when you can play the passage flawlessly.

Another useful approach is subdividing beats. If you’re working on a riff at 100 BPM, try playing quarter notes first, then switch to eighth or sixteenth notes. This variation improves rhythmic versatility and prepares you for more complex pieces.

The Subtleties of Tempo in Different Musical Styles

Tempo isn’t just about numbers, it defines the groove of a song. A medium tempo, typically 90-120 BPM, is ideal for rock and pop, while jazz can vary widely, from slow ballads around 60 BPM to bebop tunes exceeding 200 BPM. Metal and punk often push even higher, demanding both speed and precision.

Interestingly, some legendary guitarists are known for playing behind the beat, intentionally lagging slightly to create a laid-back feel. B.B. King and Stevie Ray Vaughan mastered this technique, making their blues licks feel more expressive. Genres like funk rely on very precise execution, where every note must align perfectly with the rhythm section, being played slightly behind the beat.

A Simple But Essential Habit: Tap Your Foot To Feel The Tempo

Have you noticed that musicians always mark the tempo before they start playing? Whether it’s a drummer tapping their sticks or a guitarist nodding their head, it’s their way of setting the right groove for everyone.

To build this habit, practice tapping your foot to every song you listen to.
This simple gesture will help you feel the tempo more naturally and play more steadily, especially when playing with others.

Common Mistakes and How to Avoid Them

While learning to control tempo, beginners often encounter the following pitfalls:

  • Ignoring the metronome: Relying solely on intuition can lead to inconsistent timing.
  • Speeding up difficult sections: If a passage trips you up, slow it down instead of forcing it.
  • Not counting aloud: Counting out loud reinforces internal timing and improves rhythmic accuracy.
  • Focusing only on speed: Precision matters more than playing at breakneck tempos.

Ready to Refine Your Rhythm?

Mastering tempo is an essential step toward becoming a solid guitarist. Start slow, use a metronome, and experiment with different BPMs to strengthen your rhythmic foundation. With patience and consistent practice, you’ll develop a natural feel for timing, making your playing sound more polished and expressive.

guitar pentatonic scale by dan holton

Mastering the Pentatonic Scale: The Essential Five Positions

The Backbone of Rock, Blues, and Beyond

Key Takeaways:

  • The pentatonic scale is a five-note scale that forms the foundation of many iconic solos.
  • Both major and minor pentatonic scales share the same five shapes, with the difference being the placement of the root note.
  • Mastering the five positions allows you to move across the entire fretboard.
  • These positions connect across the entire fretboard, making it easier to play fluid solos and avoid repetitive phrases.

Understanding the Pentatonic Scale

The pentatonic scale is often the first scale guitarists learn beyond basic open chords, and for a good reason! Stripped down from the standard seven-note diatonic scale, it removes certain intervals that can create tension, making it highly versatile and easy to use. That’s why you hear it in everything from blues legends like B.B. King to hard rock anthems from Led Zeppelin.

In its major form, the pentatonic scale consists of the root, second, third, fifth, and sixth. The minor pentatonic, on the other hand, contains the root, flat third, fourth, fifth, and flat seventh. These subtle differences define the scale’s emotional quality: major sounding bright and uplifting or minor giving that classic bluesy, expressive feel.

The Five Positions of the Pentatonic Scale

If you’ve ever felt stuck playing the same box shape over and over, it’s time to break out and explore all five positions of the pentatonic scale. These positions connect across the neck, helping you solo more fluidly and avoid repetitive licks.

The best part? These shapes stay the same whether you’re playing the major or minor pentatonic. The only things that change are the key and the harmonic context.

A common beginner mistake is learning just one box and staying trapped in it. While the second position is a great starting point:

  • Identify the root notes in each position so you always know where you are within the scale.
  • Once you’ve got one or two pentatonic positions down mechanically, bring them to life by working on rhythm, phrasing, note accentuation, and exploring non-linear note sequences.
  • Experiment with phrasing techniques like bends, slides, and vibrato. These are what make a scale sound musical rather than mechanical.

Practical Tips for Learning the Pentatonic Scale

A great way to internalize these five positions is to practice them within a musical context rather than as isolated exercises. Here’s how:

  • Play over backing tracks in both major and minor keys to hear how each scale interacts with the harmony.
  • Target the root notes in each shape so you always know where you are in the scale.
  • Experiment with phrasing techniques like bends, slides, and vibrato. This is what makes a scale sound musical rather than robotic.
  • Connect the shapes gradually rather than trying to memorize them all at once. A good trick is to play one shape and slide into the next without stopping.

Common mistake: Many beginners tend to rush through learning all five shapes without truly absorbing each one. Take your time, focus on clean execution, and ensure you can visualize the root notes before moving on.

Breaking Out of the Box (Literally)

One of the biggest breakthroughs in learning the pentatonic scale comes when you stop seeing it as five isolated boxes and start treating it as a continuous roadmap across the neck. Legendary players like Eric Clapton and Slash mastered this skill, which is why their solos flow effortlessly from low to high notes without feeling stuck in a pattern.

Try this: Instead of running up and down one box, use horizontal movement: slide between positions while keeping your phrases connected. This technique is key for achieving a more professional and expressive sound.

Start Practicing the Pentatonic Scale Today

The pentatonic scale is an essential tool for any guitarist, from complete beginners to advanced players looking to refine their soloing technique. Learning all five positions will open up new creative possibilities, making it easier to improvise, compose, and develop your unique playing style.

So, pick up your guitar, start working through these shapes, and before long, you’ll be weaving them effortlessly into your solos… just like the greats!

hammer-on and pull-off by dan holton

Mastering Guitar Hammer-Ons and Pull-Offs: Essential Techniques for a Smooth Legato Sound

The Foundation of Expressive Guitar Playing

Legato techniques like hammer-ons and pull-offs are at the heart of fluid and expressive guitar playing. Used across countless genres they allow guitarists to transition smoothly between notes without excessive picking. Players like Jimi Hendrix, Eric Clapton, and David Gilmour have all used them to create signature licks that feel effortless yet powerful.

At first, these techniques can seem deceptively simple, but executing them cleanly requires control, precision, and finger strength. Many beginners struggle with weak articulation or inconsistent pressure, leading to muffled or barely audible notes. If you’ve ever tried a hammer-on and felt like the note just disappeared, you’re not alone: it’s a common issue that comes down to finger independence and technique.

Key Takeaways: What You’ll Learn Here

  • The correct technique for hammer-ons and pull-offs (and why they aren’t just about finger movement).
  • Common mistakes that weaken your sound and how to fix them.
  • How to practice effectively to develop strength and clarity.
  • What a trill is and why it’s the next step once you master the basics.

Getting the Basics Right: How to Play a Hammer-On Correctly

A hammer-on occurs when you pluck a note and then press down on a higher fret without picking again. The goal is to transfer enough energy with your fretting hand so that the second note rings clearly.

One of the best exercises to start with is on the G string, using the A minor pentatonic scale. Try this:

  • Fret the 5th fret with your index finger and pick the string.
  • Immediately “hammer” down onto the 7th fret with your ring finger.
  • Focus on hitting the fretboard with enough pressure to make the second note sound as loud as the first.

At first, many players struggle with weak hammer-ons that barely produce a sound. The trick is to aim for the edge of the fret and strike the string decisively, rather than pressing too lightly or hesitating. Some players keep their thumb behind the neck, while others rest it over the top. Both are fine, as long as your hand feels stable.

A common mistake? Lifting the first finger too soon. If you do this, you’ll lose sustain and kill the note prematurely. Keep it firmly planted on the fretboard until the hammer-on is complete.

Pull-Offs: The Secret Is in the Motion

If hammer-ons feel relatively intuitive, pull-offs can be trickier. Instead of simply lifting your finger off the string, you need to actively pluck it downward with your fretting hand. This is where many beginners go wrong: they assume a pull-off is just “letting go” of the note, but without a small downward flick, the lower note won’t ring out properly.

Try this exercise:

  • Fret the 7th fret on the G string with your ring finger and the 5th fret with your index finger.
  • Pick the note on the 7th fret, then pull your ring finger downward before releasing it.
  • Make sure your index finger stays firmly in place so the 5th fret note rings clearly.

The key is to treat the pull-off as a miniature pluck, not just a lift. If the second note is barely audible, focus on generating a little extra force while pulling your finger downward.

Trills: Combining Hammer-Ons and Pull-Offs

Once you’ve nailed hammer-ons and pull-offs separately, it’s time to put them together. A trill is a rapid alternation between two notes using repeated hammer-ons and pull-offs. This technique is commonly used in lead guitar playing, adding an expressive, fluttering effect to phrases.

A simple trill exercise:

  • Place your index finger on the 5th fret of the G string.
  • Use your ring finger to hammer onto the 7th fret and then pull off back to the 5th fret.
  • Repeat this motion as quickly as possible while keeping both notes even in volume.

Many beginners find trills exhausting at first. That’s completely normal. They demand finger endurance, so start with short bursts of a few seconds before extending the duration. If your hand tenses up, take a break and shake it out.

Practice Tips and Common Mistakes to Avoid

Building strength and precision with these techniques takes time, so small, focused practice sessions are more effective than mindlessly repeating the motions. Here’s how to get the most out of your practice:

  • Start slow: Speed comes with accuracy, not the other way around.
  • Use a metronome: Keeping a steady rhythm is crucial, especially for trills.
  • Listen carefully: If one note is consistently weaker, adjust your pressure and motion.
  • Experiment with different fingers: Hammer-ons and pull-offs aren’t limited to the ring finger. Try using your middle and pinky fingers too.

A classic beginner mistake is overusing the picking hand instead of relying on legato strength. If you’re tempted to “help” a weak hammer-on with an extra pick stroke, resist the urge. It’s better to train your fingers properly from the start.

Applying These Techniques in Real Music

Once you feel comfortable, start looking for songs that incorporate hammer-ons and pull-offs. Many classic rock and blues solos rely heavily on them: The Beatles’ Come Together with hammers, the intro of Hey Joe by Jimi Hendrix with hammers and pull-offs, and Eric Clapton’s “Layla” features expressive hammer-ons in its lead lines.

Even simple riffs, like AC/DC’s “Back in Black”, use these techniques to create a smooth, punchy feel. Learning them in context will help you understand their expressive potential beyond just technical exercises.

Start Practicing Today

Mastering hammer-ons, pull-offs, and trills is an essential step toward fluid, expressive playing. Whether you’re working on your first blues solo or refining your technique for rock leads, these techniques will improve your control, phrasing, and musicality.

Now, grab your guitar and start experimenting! Your fingers (and your future solos) will thank you.