beginner guitar mindset by julien bitoun

Beginning Guitar Mindset: How to Make Learning Fun and Effective

When Jimi Hendrix first picked up a guitar, he started by playing simple blues riffs on a one-string ukulele. Like many guitar legends, his journey began with the basics, proving that everyone starts somewhere. Learning the guitar is about embracing that beginner’s spirit while building a solid foundation for growth.

The Journey Begins: Beyond Just Practice

Where passion meets persistence

The guitar has a rich history of self-taught musicians who changed music forever. From Robert Johnson to Eddie Van Halen, many started by learning songs they loved. This approach remains powerful today – learning guitar should feel like discovering your own musical voice rather than completing a prescribed set of exercises.

Most beginners make the mistake of diving straight into technical drills without understanding their musical goals. Instead, focus on connecting with the instrument through familiar songs. The basic techniques will naturally follow as you explore the music that moves you.

Starting Smart: The Two-Phase Approach

Phase 1: Building Your Foundation

A common pitfall for newcomers is trying to run before they can walk. The key is starting with simplified versions of songs you know. Take “Smoke on the Water” – while the original uses power chords, you can start with single notes to get the iconic riff under your fingers.

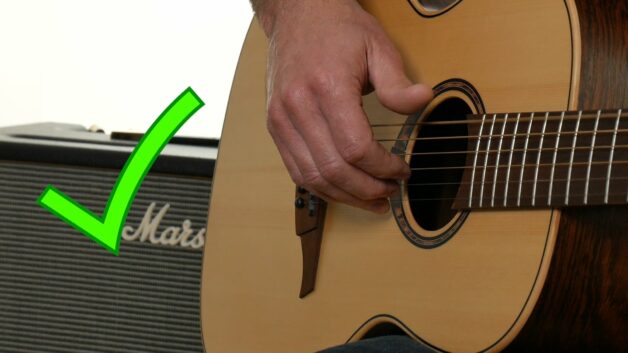
During this initial phase, focus on developing proper posture and hand positioning. Many students develop tension in their fretting hand, particularly when forming their first chord shapes. Keep your thumb positioned behind the neck and your wrist straight – this fundamental approach will serve you well as you progress to more complex techniques.

Phase 2: Developing Your Musical Voice

As your confidence grows, you’ll naturally want to explore different styles and techniques. This is where the real fun begins. You’ll discover how the same pentatonic scale can sound completely different when played by B.B. King versus Jimmy Page. Understanding these nuances comes from experimenting with various techniques:

Essential skills to develop include:

  • Basic open chords (A, D, G, C, Em) and their relationship to common progressions
  • Fundamental rhythm patterns (strumming patterns for different genres)
  • Core lead techniques (bending, sliding, hammer-ons)

Practice Strategies That Actually Work

Traditional wisdom often suggests practicing for hours daily, but research in musical education shows that focused, shorter sessions produce better results. Aim for consistency over marathon practice sessions – your brain needs time to process and integrate new skills.

A practical approach is to break your practice into specific areas. Spend five minutes on chord transitions, another five on rhythm work, and five on new material. This targeted practice helps prevent the common problem of noodling aimlessly without making real progress.

Remember that every guitarist, from Django Reinhardt to John Mayer, started with these same fundamentals. The key is maintaining patience while challenging yourself just enough to stay engaged. With regular practice and the right mindset, you’ll be surprised at how quickly you progress from simple chord progressions to your favorite riffs and solos.

Focus on making music rather than just executing exercises. If you’re struggling with a particular chord change, try incorporating it into a simple song rather than drilling it in isolation. This approach keeps the learning process musical and engaging while building real-world playing skills.

Stay relaxed, stay curious, and most importantly, keep playing. The guitar is an instrument that rewards persistence with moments of pure joy when everything clicks into place.

how to tune your guitar by hubert boulogne

How to Tune a Guitar with a Digital Chromatic Tuner

Key Takeaways

  • Learn the standard guitar tuning: E, A, D, G, B, E
  • Understand how a chromatic tuner detects pitch and helps you adjust tuning
  • Know when to tighten (counterclockwise) or loosen (clockwise) the tuning keys
  • Always recheck all strings after tuning to compensate for neck tension changes

Understanding Guitar Tuning: The Basics

Tuning a guitar is an essential skill for any guitarist, whether beginner or experienced. A well-tuned guitar ensures that your playing sounds clear and harmonious. In standard tuning, the six strings are tuned to the following notes, from lowest to highest pitch:

  • Low E (6th string)
  • A (5th string)
  • D (4th string)
  • G (3rd string)
  • B (2nd string)
  • High E (1st string)

A digital chromatic tuner makes this process much easier by detecting the pitch of each string and showing whether it is too high (sharp) or too low (flat).

Step-by-Step Guide to Tuning a Guitar

1. Play the String and Observe the Tuner

Start by plucking a string and watching the tuner’s display. The tuner will indicate the closest detected note and whether the pitch is too high or too low.
• If the indicator leans left, the string is flat (too low)
• If the indicator leans right, the string is sharp (too high)
• If the light is centered, the string is perfectly in tune

2. Adjusting the Tuning Keys

To bring the string to the correct pitch:
• If flat (too low): Tighten the string by turning the tuning key counterclockwise
• If sharp (too high): Loosen the string by turning the tuning key clockwise

3. Tuning Each String in Order

Go through each string using the tuner:
• Low E (6th string): Tune up if flat, down if sharp
• A (5th string): Adjust if needed, referencing A on the tuner
• D (4th string): Ensure it is in tune by tightening or loosening
• G (3rd string): Follow the tuner’s guidance
• B (2nd string): Bring it to the correct pitch
• High E (1st string): Make final adjustments

Final Check: Ensuring Stability

After tuning all six strings, the overall neck tension may shift, slightly affecting tuning. To correct this, go through each string one more time to confirm they remain in tune. This ensures greater stability and prevents the guitar from slipping out of tune quickly.

Mastering how to tune a guitar is a fundamental step in becoming a confident guitarist. With practice, this process will become second nature, allowing you to keep your instrument sounding its best at all times.

beginning guitar by hubert boulogne

Beginning Guitar: Your First Steps on the Instrument

Key Takeaways:

  • Learn the proper posture and hand positioning to avoid bad habits.
  • Understand how to hold a guitar pick and strum correctly.
  • Get introduced to guitar notation, tablatures, and chord diagrams.
  • Practice basic rhythm concepts with progressive exercises and full songs.

Getting Started with Beginning Guitar

If you’re starting your journey on the guitar, you might feel overwhelmed by where to begin. The good news is that learning the basics correctly from the start will set you up for steady progress. This lesson is designed to help you build strong foundations, ensuring you develop good habits that will make playing easier as you improve.

From holding your instrument properly to reading tablatures and chord diagrams, this first step will give you all the essential tools to feel comfortable with the guitar.

right guitar posture by hubert boulogne

How to Maintain the Correct Guitar Posture for Beginners

Key Takeaways:

  • Sit at the edge of your chair to ensure better balance and mobility.
  • Keep your back straight to avoid tension and discomfort.
  • Position the guitar on your right leg (if you’re right-handed) for optimal control.
  • Adjust the guitar’s angle slightly forward for easier access to the fretboard.

Step-by-Step Guide to the Right Guitar Posture

  1. Sit at the Edge of Your Chair

Instead of leaning back, sit slightly forward on the edge of your chair. This position helps maintain balance and prevents slouching, which can cause tension in your back and shoulders.

  1. Keep Your Back Straight

A straight back supports better breathing and hand coordination. Slouching can make it harder to move your fingers fluidly across the fretboard and may lead to long-term discomfort.

  1. Position the Guitar Properly

If you’re playing right-handed, rest the guitar on your right leg. Make sure the guitar lays flat against your thigh and is pulled close to your stomach. This keeps the instrument stable and makes it easier to reach the frets.

  1. Angle the Guitar Slightly Forward

Tilting the neck of the guitar forward a little improves visibility of the fretboard and allows for more comfortable hand positioning. This adjustment is particularly helpful for beginners still getting used to chord shapes and transitions.

basic rhythm concepts: bpm, metronome and measures, by hubert boulogne

Understanding Basic Rhythm Concepts for Beginners

Key Takeaways

  • Tempo refers to the speed of a song, measured in beats per minute (BPM).
  • A click track provides a steady beat to help musicians stay in time.
  • Bars and time signatures define how beats are grouped in a piece of music.
  • Note duration determines how long a note is played, with common values including whole notes, half notes, and quarter notes.
  • Practicing with foot tapping can help you develop a solid sense of rhythm.

Mastering Rhythm: Essential Concepts for Beginner Guitarists

When learning to play guitar, understanding rhythm concepts is just as important as knowing where to place your fingers on the fretboard. A strong rhythmic foundation allows you to stay in sync with other musicians, play songs with accuracy, and develop a natural groove. In this lesson, we’ll break down essential rhythm concepts, including tempo, time signatures, and note duration.

Tempo: The Speed of a Song

Tempo is the speed at which a song is played, measured in beats per minute (BPM). A slow tempo creates a relaxed feel, while a fast tempo adds energy and excitement. To illustrate this, try playing a simple rhythm at a slow BPM and then gradually increase the speed.

To stay consistent with tempo, many musicians use a click track, which is a series of steady clicks that act as a metronome. Before a song begins, a count-in (one or two bars of clicks) helps set the rhythm, allowing you to prepare before playing. A great tip is to tap your foot to the beat. This helps internalize the tempo and maintain a steady rhythm throughout a piece.

Bars, Time Signatures, and Beat Counting

Music is divided into bars (or measures), which contain a set number of beats. The number of beats per bar is determined by the time signature.

For beginners, the most common time signature is 4/4, meaning:

  • Each bar has four beats.
  • Each beat is represented by a quarter note.

Counting out loud as you play “one, two, three, four” is a great way to reinforce this structure. Practicing with different time signatures later on will help expand your rhythmic versatility.

Understanding Note Durations

Rhythm is also defined by how long each note is played. In this lesson, we’ll focus on three basic note durations:

  • Whole note – Lasts for four beats (1-2-3-4).
  • Half note – Lasts for two beats (1-2, 3-4).
  • Quarter note – Lasts for one beat (1, 2, 3, 4).

By practicing these note values in different combinations, you’ll develop a sense of timing and flow in your playing.

How to Improve Your Rhythm Skills

  • Use a metronome or click track to develop timing accuracy.
  • Count out loud while playing to reinforce beat awareness.
  • Tap your foot consistently to maintain a steady rhythm.
  • Start slow and gradually increase tempo as you become comfortable.
  • Practice clapping rhythms before playing them on the guitar.
how to hold the guitar pick by hubert boulogne

How to Hold the Guitar Pick: A Beginner’s Guide

Key Takeaways:

  • Light grip: Hold the pick between your thumb and index finger without squeezing too hard.
  • Hand position: Your hand should float above the strings, with your wrist slightly angled.
  • Use your wrist: Strum with your wrist, not your forearm.
  • Playing technique: Learn the difference between downstroke and upstroke.

How to Hold a Guitar Pick Correctly

Mastering how to hold the guitar pick is a fundamental step for any beginner. A proper grip ensures better control, precision, and fluidity in your playing. Whether you are strumming chords or picking individual notes, understanding the correct hand position and movement will set you up for success.

Step 1: Holding the Pick Properly

Start by grabbing the pointed end of the pick with your non-playing hand. Then, slightly bend your index finger of your picking hand and place the pick on top of the first phalange (the section closest to your fingertip). Hold it firmly in place using your thumb.

Key tip: Maintain a relaxed grip. Too much tension can make your playing stiff and limit movement. A loose but controlled hold will allow for smoother strumming and picking.

Step 2: Hand and Wrist Positioning

To avoid strain and improve precision, your forearm should rest on the side of the guitar. Your hand should float between the bridge and the neck, allowing easy access to the strings.

  • Your wrist should be slightly angled, not flat.
  • Keep your hand hovering above the strings, not resting on the guitar body.
  • Most importantly, use your wrist for movement, not your forearm.

This technique ensures a natural and fluid playing motion, reducing fatigue and improving accuracy.

Step 3: Downstrokes and Upstrokes

Once your hand is positioned correctly, you can start striking the strings:

  • Downstroke: A downward motion across the strings.
  • Upstroke: An upward motion, lifting the pick towards you.

Alternating between downstrokes and upstrokes is essential for dynamic and expressive playing. Practicing this technique will help you develop rhythm and control over your strumming patterns.

how to fingerpick on guitar by hubert boulogne

How to Fingerpick on Guitar: A Beginner’s Guide to Mastering Fingerstyle

First Steps: Discovering Your Fingers

Fingerpicking involves playing guitar by plucking the strings directly with your fingers instead of using a pick. Unlike strumming chords rhythmically, fingerstyle allows you to highlight melodies and harmonies simultaneously. This technique, central to folk, classical, and acoustic blues styles, creates a rich, layered sound. But beginners often find fingerpicking challenging at first due to the coordination it requires.

One of the early challenges is simply learning to position your fingers correctly. It’s natural to feel some awkwardness or tension in your wrist or fingers as you start. Even legendary guitarists like Paul Simon or James Taylor had to patiently overcome initial discomfort to master their celebrated fingerstyle technique.

Key Takeaways:

  • Fingerpicking uses individual fingers instead of a pick to pluck guitar strings.
  • Proper wrist positioning and relaxed fingers are crucial.
  • Specific finger assignments simplify your learning: Thumb (P), Index (I), Middle (M), and Ring (A).
  • Reading tablature helps beginners grasp fingerstyle faster.

Proper Fingerpicking Technique for Beginners

A solid fingerpicking foundation begins with positioning. Rest your forearm lightly on the upper edge of the guitar, just enough to stabilize your hand without pressing down. Avoid the common beginner mistake of resting your wrist on the guitar’s body, as this severely limits finger movement and can cause tension or discomfort.

Relax your wrist and let your fingers curve naturally towards the strings. Specifically, your thumb (marked as P in guitar tablature) should rest in a concave shape on the low E string, slightly closer to the guitar neck. The other three fingers, index (I), middle (M), and ring (A), are positioned on the G, B, and high E strings respectively, closer to the bridge. This positioning allows clear separation of bass and melody, essential for fingerstyle clarity.

Quick Tip for Teachers:

Many guitar teachers recommend beginners practice gently plucking strings separately, using only one finger at a time. Simple exercises, like alternating between thumb and index finger on an open chord (for example, an easy-to-play chord such as G major), greatly enhance finger independence and comfort.

Common Mistakes When Learning to Fingerpick

Beginners frequently run into certain pitfalls. One common issue is excessive movement, particularly moving the entire hand rather than just the individual finger. Fingerpicking demands minimal, controlled motion. When plucking with your thumb, rotate gently from the joint at the base of your thumb, using the fleshy side rather than the tip. Similarly, fingers should move from the middle joint, not from your knuckles or wrist. Mastering these subtle movements requires patience, but practicing slowly and deliberately helps.

Another frequent difficulty is understanding finger notation in tablatures, which can appear confusing at first glance. Remember, each finger corresponds to a letter:

  • P – Thumb
  • I – Index finger
  • M – Middle finger
  • A – Ring finger

Keeping this simple system in mind speeds up your ability to translate exercises from paper to strings.

Practical Exercises for Fingerstyle Beginners

If you’re new to fingerpicking, start with straightforward patterns that you can easily repeat without frustration. Choose a few simple fingerpicking patterns and adapt them to the songs of your choice.

Practicing regularly at a slower tempo before gradually increasing speed helps build muscle memory. Remember: consistency matters more than intensity. Short, frequent sessions yield far better results than sporadic long practice sessions.

Start Fingerpicking Today and Expand Your Guitar Skills

Learning how to fingerpick on guitar opens musical doors to songs and styles previously inaccessible with basic strumming alone. It enhances musical expression and deepens your connection with your instrument. With thoughtful practice and an understanding of common pitfalls, even absolute beginners quickly discover the rewarding journey fingerstyle guitar offers.