triplets by dan holton

Mastering Triplets: The Key to Unlocking Rhythmic Flow

Triplets: A Small Shift That Changes Everything

Triplets are one of those rhythmic tools that can completely transform your playing, yet they often feel unnatural at first. The reason? Most beginners are accustomed to dividing beats into twos and fours, making triplets feel slightly off-kilter. But once you get the hang of them, they add a smooth, rolling quality to your playing that’s used in everything from blues to metal.

The Basics: What Exactly Are Triplets?

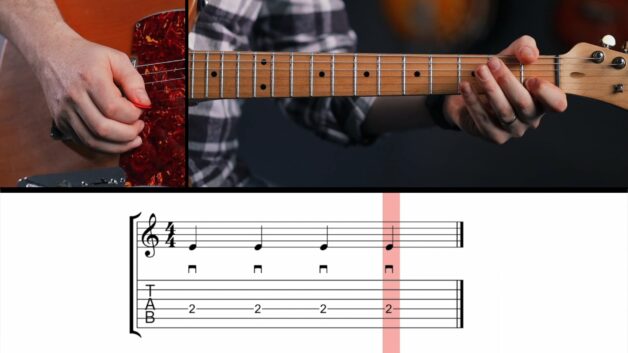
In simple terms, a triplet divides a beat into three equal parts instead of the usual two or four. The most common form is the eighth note triplet, where each beat of a measure gets split into three notes instead of two. To count this, musicians often say “trip-let, trip-let” over a standard four-beat measure.

There are also quarter note triplets and sixteenth note triplets. Quarter note triplets can be tricky because they stretch across two beats, requiring a solid grasp of timing. Sixteenth note triplets, on the other hand, fit six notes into each beat, making them feel fast and dense which is great for lead guitar runs and flashy solos.

Picking Techniques: Downstrokes, Alternate Picking and Common Pitfalls

When it comes to playing triplets cleanly, your picking technique is crucial. There are two main approaches:

  • Down-up-down picking: This method provides a natural reset at the start of each beat, helping to keep things controlled.
  • Strict alternate picking: This keeps the motion fluid and even, which is useful for faster passages.

Beginners often struggle with keeping triplets evenly spaced. One common mistake is rushing the third note, causing an uneven feel. A metronome is your best friend here: start slow and focus on making each note perfectly even before increasing speed.

How Triplets Appear in Real Music

Triplets aren’t just an abstract concept, they’re everywhere. Listen to blues guitarists like B.B. King and you’ll hear them woven into solos. Jazz swing rhythms are built around triplets, and even heavy metal riffs sometimes use them for a galloping effect (think Iron Maiden). Practicing triplets in isolation is helpful, but playing them over a backing track will help you feel their true musical role.

Practical Exercises for Mastering Triplets

Building fluency with triplets takes time, but structured exercises can make the process smoother:

  • Clap and Count: Tap your foot while saying “trip-let” aloud to internalize the rhythm.
  • Metronome Drills: Set a slow tempo and play eighth note triplets, gradually increasing speed as you gain control.
  • Apply to Simple Licks: Try playing a basic blues lick using triplets to hear how they change the feel.
  • Experiment with Picking Patterns: Play triplets using both down-up-down and strict alternate picking to see which feels more natural.

A Word of Caution: Avoid These Beginner Mistakes

  • Ignoring accents: Try emphasizing the first note of each triplet to create a natural pulse.
  • Speeding up too soon: Focus on consistency before increasing tempo.
  • Skipping the metronome: Even experienced guitarists use one to keep their timing precise.

Bringing Triplets Into Your Playing

At first, triplets might feel awkward, but they’re worth the effort. Whether you’re working on a blues solo, jazz comping, or metal riffing, they provide a rhythmic flexibility that opens up new creative possibilities. Start with slow, deliberate practice, and soon enough, triplets will feel as natural as standard eighth notes.

dotted note by dan holton

Understanding the Dotted Note: A Rhythmic Essential

The Secret Behind Dotted Notes (And Why They Matter)

If you’ve ever found yourself puzzled by that small dot sitting next to a note in sheet music, you’re not alone. Dotted notes are one of those rhythmic elements that seem trickier than they actually are. Once you understand how they work, you’ll start seeing them everywhere, from classical compositions to blues, rock, and jazz.

What Does a Dotted Note Do?

At its core, a dotted note simply extends the length of a note by half of its original value. This means:

  • A dotted half note (normally two beats) lasts three beats.
  • A dotted quarter note (normally one beat) stretches to one and a half beats.
  • A dotted whole note (normally four beats) extends to six beats.

This rhythmic device isn’t just an abstract theory: it shapes the groove and feel of a piece. Think about the swinging pulse in jazz or the syncopation in reggae; both often rely on dotted rhythms to create that characteristic bounce.

Counting Dotted Notes: A Skill Every Guitarist Needs

For beginners, the biggest challenge with dotted notes is counting them correctly. It’s tempting to rush or misjudge the added duration. A simple way to internalize the rhythm is to count it out loud:

  • A dotted quarter note is counted as “one-and”, emphasizing that extra half beat.
  • A dotted half note in 3/4 time feels like “one, two, three” instead of the usual two beats.

A great exercise is to tap your foot while clapping different dotted note rhythms. If you play along to songs like Blackbird by The Beatles, you’ll notice how dotted rhythms help drive the melody forward.

The Double Dot: A Less Common But Useful Trick

For those who love rhythmic challenges, the double dot takes things a step further. Instead of adding just half the note’s value, the second dot adds half of the first dot’s value. In practice, this means:

  • A double-dotted half note extends to three and a half beats.
  • A double-dotted quarter note lasts one and three-quarters beats.

Double dots aren’t as common as single dots, but they do appear in detailed compositions, particularly in classical music. Bach and Chopin often used them to shape expressive phrasing.

Common Beginner Mistakes (And How to Avoid Them)

Many guitarists struggle with dotted notes in the beginning. Here are a few common pitfalls:

  • Rushing the extra beat – Beginners often cut the dotted duration short, especially in faster tempos.
  • Ignoring the time signature – Dotted notes feel different in 3/4 than in 4/4 time, so always check the context.
  • Forgetting to tap the pulse – Internalizing rhythm is much easier if you physically feel the beat.

To avoid these mistakes, practice playing simple dotted quarter note exercises with a metronome. Start slow and gradually increase speed while keeping the beat steady.

How to Integrate Dotted Notes into Your Playing

Understanding dotted notes is one thing, but applying them musically is where things get exciting. Here’s how to get started:

  • Play well-known songs with dotted rhythms (Yesterday by The Beatles uses them in the vocal melody).
  • Experiment with rhythmic variations – Try turning straight quarter-note strumming into a dotted rhythm pattern.
  • Write your own exercises – Create short riffs that incorporate dotted notes to solidify your understanding.

Ready to Take Your Rhythm to the Next Level?

Dotted notes are a small but powerful tool in your rhythmic arsenal. The more you practice them, the more natural they’ll feel in your playing. Whether you’re reading sheet music, improvising, or writing your own songs, mastering dotted rhythms will give you a deeper command over musical timing and expression.

tie or note tie by dan holton

Understanding Note Ties in Sheet Music: A Must-Know for Guitarists

The Secret to Smoothly Sustained Notes

If you’ve ever played a song and wondered how musicians create those seamless, flowing notes, note ties are a big part of the answer. Unlike separate notes that require multiple attacks, tied notes allow a single note to ring out for an extended duration. This is especially useful in legato phrasing, where you want a smooth, uninterrupted sound instead of choppy, detached notes.

What Is a Note Tie and Why Does It Matter?

A note tie is a curved line that connects two notes of the same pitch, indicating that they should be played as a single sustained note. Instead of picking or striking the second note, the original note continues to ring out for its full combined duration. This technique is essential for reading sheet music and understanding rhythmic phrasing beyond basic note values.

For example, imagine playing an A on the G string (second fret) in 2/4 time. If a tie extends that note into the next measure, the A keeps ringing rather than being struck again. This seemingly simple concept plays a crucial role in making music sound more natural.

Learning to Recognize and Play Tied Notes

Tied notes appear frequently in sheet music, where they help extend note values that would otherwise be cut short by bar lines. In tablature, they are less common but may be represented with brackets or other notations to indicate sustain.

You’ll often find ties in these scenarios:

  • Across beats: A quarter note tied to an eighth note extends the sound without requiring another pick stroke.
  • Across bar lines: If a note needs to be held over into the next measure, a tie ensures that it continues smoothly.
  • Syncopated rhythms: Ties are frequently used in jazz and blues to create offbeat phrasing.

One of the biggest challenges beginners face is not instinctively re-picking the tied note. It’s natural to want to strike every note you see, but in reality, tied notes require patience and control. Developing a strong sense of rhythm and internal timing will help you master this concept.

A Common Beginner Mistake And How to Fix It

A frequent issue among new guitarists is mistaking a tie for a slur (hammer-on or pull-off). While a tie extends the duration of a note without re-plucking, a slur means transitioning smoothly between two different notes. This confusion can lead to inconsistent phrasing, where tied notes are mistakenly played as separate articulations.

To avoid this, focus on counting and listening carefully. If a note is tied, it should sustain for the combined duration of both notes without an additional attack. Practicing with a metronome can help reinforce this.

Teaching Tips: How to Incorporate Tied Notes into Your Playing

Many beginner-friendly songs use tied notes, even if they’re not immediately obvious. The Beatles’ “Let It Be” or Eric Clapton’s “Tears in Heaven” include passages where sustaining a note rather than picking again makes all the difference in musicality.

To improve your recognition and execution of tied notes:

  • Practice simple rhythms first: Clap out a tied rhythm before playing it.
  • Use slow backing tracks: This helps develop control over sustaining notes properly.
  • Record yourself: Listening back will reveal whether you’re holding notes for their full value or cutting them short.

Master Tied Notes for a More Expressive Guitar Sound

Now that you understand how note ties work, try spotting them in your favorite sheet music or tablature. Play through a passage with tied notes, paying attention to sustain and timing. With time and practice, you’ll notice how ties contribute to smoother phrasing, making your playing sound more polished and expressive.

sixteenth rest by dan holton

Mastering the Sixteenth Rest: The Key to Rhythmic Precision

The Silent Beat That Shapes Your Groove

Rhythm isn’t just about what you play, it’s also about what you don’t. The sixteenth rest is a small but powerful element in rhythmic phrasing. It lasts as long as a sixteenth note, meaning in a standard 4/4 time signature, it replaces a fraction of a beat. If you’ve ever listened to funk, R&B, or even complex rock riffs, you’ve already heard how these rests create syncopation and groove.

What Exactly is a Sixteenth Rest?

To break it down, a single beat in 4/4 time can be divided into four sixteenth notes, counted as “1 e & a”. A sixteenth rest takes the place of one of these counts, creating a moment of silence that influences the rhythmic feel. This is a common technique used in genres that thrive on tight, percussive playing. James Brown’s rhythm sections and Nile Rodgers’ guitar work are prime examples of grooves shaped by rests as much as by notes.

A simple exercise to hear the effect: try counting “1 e & a 2 e & a”, but stay silent on one of those beats. For example, if you mute the “a” every time, you get a distinct feel. Move the rest to another subdivision, and suddenly, you’ve altered the groove entirely.

Getting Hands-On: Three Essential Practice Patterns

Mastering rhythm requires muscle memory, so practicing different sixteenth rest placements is key. Here are three patterns to start with:

  • Rest on the “a”: Play 1 e & and rest on a.
  • Rest on the “&”: Silence the “&” for a syncopated bounce.
  • Rest on the “1”: Beginning a beat with a rest creates an offbeat feel.

At first, these exercises may feel unnatural. Many beginners struggle with maintaining steady timing when a note is removed. It’s normal. The trick is to keep counting internally and feel the groove even in the silence. Practicing with a metronome helps immensely, especially at slow tempos.

The Common Pitfalls of Learning Rests

Beginners often approach rests passively, treating them as mere gaps in sound. The reality is, rests are active components of rhythm. They define phrasing and should be executed with intention. A poorly timed sixteenth rest can throw off an entire riff, especially at high tempos.

One mistake is rushing through rests, shortening them unintentionally. The best way to avoid this is by clapping or tapping the rhythm before applying it to the guitar. Drummers often develop this instinct naturally.

Why This Matters Beyond Theory

Understanding sixteenth rests isn’t just about reading sheet music. If you’re jamming with others, recording, or improvising, knowing when to not play is just as crucial as knowing when to attack a note. Players like John Frusciante and Steve Cropper mastered rhythmic spacing, allowing their guitar parts to breathe within the mix.

Take Your Rhythm Further

Start by applying these rest placements to simple chord progressions. E minor to A major is a good place to start. Try muting different sixteenth note subdivisions while strumming, and listen to how the groove shifts. The more control you develop over rests, the tighter your playing will become.

Practice regularly, use a metronome, and don’t shy away from silence, it’s an essential part of making your playing more musical.

sixteenth note by dan holton

Mastering Sixteenth Notes: Unlocking Precision in Your Playing

Key Takeaways

  • Sixteenth notes subdivide each beat into four equal parts, doubling the speed of eighth notes.
  • Proper counting (“One E and a, Two E and a…”) ensures rhythmic accuracy.
  • Down-up picking is essential for smooth execution at faster speeds.
  • Transitioning from quarter to eighth to sixteenth notes builds fluency and control.

Sixteenth Notes: The Missing Link in Your Rhythm Skills

At some point, every guitarist encounters sixteenth notes, whether while learning funk grooves, fast lead lines, or intricate fingerpicking patterns. They add speed and fluidity to your playing, but they can also be a stumbling block if you’re not familiar with their structure. Many beginners struggle to fit these notes evenly within a beat, often rushing or dragging. The key? Consistent counting and proper picking technique.

In 4/4 time, where a quarter note gets one beat, sixteenth notes divide that beat into four equal parts. If eighth notes are counted as “One and Two and…,” sixteenth notes follow a more precise system: “One E and a, Two E and a…” This structured approach ensures that each note falls precisely in time which is something that becomes critical when increasing speed.

From Counting to Playing: Making Sixteenth Notes Click

Understanding sixteenth notes is one thing; playing them cleanly is another. A good way to develop control is by gradually transitioning between different rhythmic values. Try this simple progression:

  • Start with quarter notes (one per beat).
  • Move to eighth notes (two per beat: “One and Two and…”).
  • Shift to sixteenth notes (four per beat: “One E and a, Two E and a…”).

This exercise not only builds rhythmic accuracy but also highlights the importance of consistent picking motion. Many players instinctively want to use only downstrokes, but at higher speeds, this approach quickly becomes inefficient. Instead, use down-up alternate picking for even articulation and smoother transitions between notes.

Practical Application: Mixing Eighth and Sixteenth Notes

Many iconic riffs and solos blend different note values, making sixteenth notes an essential skill for real-world playing. A great example is the intro riff of Metallica’s “Master of Puppets”, where alternating between eighth and sixteenth notes creates its signature drive. Practicing such passages will help solidify your rhythmic control.

To start integrating sixteenth notes naturally, try this simple pattern:

  • Play an eighth note, followed by three sixteenth notes.
  • Count it as: “One E and a, Two E and a…”
  • Focus on keeping your picking hand moving in time, even during rests.

Developing Fluency and Confidence with Sixteenth Notes

Learning sixteenth notes takes patience, but the payoff is undeniable. They unlock faster picking, tighter rhythm playing, and more expressive phrasing. To build confidence:

  • Use a metronome – Start slow (60 BPM) and gradually increase speed.
  • Practice dynamic control – Play soft and loud sixteenth notes to develop touch sensitivity.
  • Experiment with different styles – Funk, metal, and blues all use sixteenth notes in unique ways.

The key to mastering sixteenth notes isn’t just speed, it’s control. Work on even spacing, clean picking, and consistent timing, and you’ll notice a huge improvement in both rhythm and lead playing.

eighth note and eighth rest by dan holton

Mastering Eighth Notes and Eighth Rests for Beginners

The Secret to Tight Rhythm: Understanding Eighth Notes

If you’ve ever tapped your foot to a song and found yourself instinctively filling in the spaces between beats, congratulations! You’ve already got a feel for eighth notes. These notes, which are half the length of quarter notes, bring energy and groove to your playing.

Most beginner guitarists start by learning whole, half, and quarter notes, but understanding eighth notes is where your rhythm really starts to open up. Instead of just counting “1, 2, 3, 4,” we introduce “1 and 2 and 3 and 4 and”, essentially doubling the number of notes per measure without changing the tempo. This simple shift creates a smoother, more flowing rhythm.

Key Takeaways to Lock in Eighth Notes

  • Count aloud: Use “1 and 2 and 3 and 4 and” to internalize the timing.
  • Use a metronome: Start slow and increase speed gradually.
  • Foot tapping matters: Tap your foot on the main beats to stay anchored.
  • Mix note values: Alternate between whole, half, quarter, and eighth notes to improve flexibility.

Practicing Eighth Notes: What Works Best

A common struggle among beginners is rushing through eighth notes or playing them unevenly. The key is consistency. Legendary jazz and rock drummers, like Ringo Starr and Buddy Rich, emphasized the importance of keeping the groove steady, a lesson that applies to guitarists as well. If your eighth notes sound choppy or rushed, slow down and focus on even spacing between notes.

One of the best exercises? Set a metronome at 60 BPM and strum on each “1 and 2 and 3 and 4 and.” Feel how each note locks into place. Once you’re comfortable, try playing a simple chord progression such as G, C, D, G with eighth note strumming. This keeps your right hand moving and builds muscle memory.

Introducing Eighth Note Rests – Silence is Part of the Music

For many beginners, the concept of rests is counterintuitive. When learning a song, there’s an instinct to fill every space with sound. But silence is just as important as the notes you play. Eighth note rests give breathing room to your rhythm, making your playing more dynamic.

An eighth rest is simple: it means you don’t play for the duration of an eighth note. Let’s say you strum an eighth note on “1” and rest on “and.” The pattern would be:

  • Play: 1 (play), and (rest), 2 (play), and (rest), etc.
  • Avoid a common mistake: Don’t let the previous note ring through the rest, or it will sound like a quarter note instead.

A great way to practice this is by playing alternating eighth notes and rests while muting your strings with your fretting hand. This will help you hear and feel the gaps in your playing.

Applying These Rhythms to Your Playing

Once you’ve locked in eighth notes and rests, you’ll start hearing them everywhere. Think of “Highway to Hell” by AC/DC. Its driving rhythm relies heavily on steady eighth notes.

The best way to integrate these techniques into your playing is to:

  • Practice with different songs: Try playing along with tracks that emphasize eighth note rhythms.
  • Experiment with rests: Strum a simple chord and add rests in different places to hear how the rhythm changes.
  • Record yourself: Listen back to check if your eighth notes are even and your rests are truly silent.

Mastering these rhythms isn’t just about following rules, it’s about developing a natural sense of timing that will serve you in any style of music. The more you practice, the more intuitive it becomes, and before you know it, your playing will feel tighter, groovier, and more professional.

whole rest, half rest and quarter rest by dan holton

Understanding Whole, Half and Quarter Rests in Music

The Art of Silence in Music: Why Rests Matter

Playing the right notes is essential, but knowing when not to play is just as crucial. Rests are an integral part of music notation, ensuring that silence is measured and intentional. For beginners, mastering rests is a gateway to better rhythm, phrasing, and overall musicianship.

The concept of rests might seem straightforward, but applying them correctly requires just as much attention as playing notes. Ever noticed how a well-placed pause in a song, like in “Blackbird” by The Beatles, adds depth and emotion? That’s the power of silence in music.

Key Takeaways

  • Whole rests last four beats, filling an entire measure in 4/4 time.
  • Half rests last two beats, dividing a measure into sound and silence.
  • Quarter rests last one beat, creating short pauses that define rhythm.
  • Properly muting strings ensures clean transitions between notes and rests.

Whole, Half and Quarter Rests Explained

A whole rest spans an entire four-beat measure in 4/4 time. It appears as a small rectangle hanging from the fourth line of the staff. Many beginner guitarists find it tricky at first to count silence, but an easy trick is to mentally replace it with a long, sustained note, just without actually playing it.

A half rest lasts two beats and looks like a small rectangle sitting on the middle line of the staff. Think of it as the pause between phrases, like a breath in a conversation. When playing, this means keeping your fingers relaxed to prevent accidental sound.

A quarter rest is even shorter, lasting only one beat. It’s represented by a jagged symbol resembling a small lightning bolt. These quick silences add a sharp, rhythmic structure to music, often heard in funk and jazz grooves.

Common Challenges and How to Overcome Them

Beginners often struggle with rests because silence isn’t as tangible as playing a note. Here are a few common difficulties and ways to work through them:

  • Forgetting to mute the strings – Unlike a piano, where silence is automatic when keys are released, guitarists need to actively stop a note. Use your fretting hand to lift pressure or lightly touch the strings.
  • Losing count of rests – A metronome helps internalize timing. Try counting out loud: “One, two, three, four (rest).”
  • Rushing through quarter rests – They feel brief, but they still hold space. Clap the rhythm first before playing it to get used to the pause.

Teaching Tips: How to Practice Rests Effectively

For self-learners and music teachers alike, structured practice is key. Here’s a method that works well:

  • Start with a simple pattern: Play a whole note, then rest for a full measure. Repeat until it feels natural.
  • Mix note values with rests: Alternate between playing and pausing in different rhythms. For example, try playing “Smoke on the Water” but inserting rests where power chords usually ring out.
  • Use well-known songs as reference: Many classics, from blues to rock, rely on rests for groove. Listen to “Billie Jean” by Michael Jackson. Its sharp rhythmic pauses define the song’s feel.

Avoiding Common Mistakes

  • Ignoring rests when reading sheet music – Many beginners focus only on the notes. Train your eyes to recognize rests as active parts of the score.
  • Playing too soon after a rest – Silence should be given its full value. Count in your head to maintain proper spacing.
  • Over-relying on tablature – Standard notation explicitly shows rests, while some tabs leave them ambiguous. Try cross-referencing both.

Refine Your Rhythm!

Understanding and applying whole, half, and quarter rests will transform your playing. With practice, these pauses will become second nature, allowing you to control silence as well as sound.