whole note, half note and quarter note by dan holton

Understanding Whole Notes, Half Notes and Quarter Notes

Whole, Half and Quarter Notes, The Foundation of Rhythm

Learning rhythm is one of the biggest hurdles for beginner guitarists. It’s easy to focus on playing the right notes while completely overlooking timing, but rhythm is what truly holds a piece of music together. Whether you’re strumming along to “Wonderwall” or trying to master blues phrasing, a solid understanding of note values is essential.

The Whole Note: Let It Ring

The whole note is the longest standard note value in common time, lasting for four full beats in a 4/4 measure. When you play a whole note, you’re letting the sound sustain for the entire bar. If you’re tapping your foot, you’ll count one, two, three, four before moving to the next note.

Many beginner guitarists struggle with keeping time when playing whole notes. Sometimes they cut them off too early, or they rush ahead without realizing it. A useful trick is to play along with a metronome or a simple drum loop to keep yourself grounded.

Half Notes: Splitting the Measure in Two

A half note lasts for two beats, meaning you can fit two of them in a measure of 4/4 time. Instead of holding for the entire measure, you now play a note on beat one and another on beat three. This subtle difference introduces a natural division in the rhythm, which is why half notes often appear in melodies that need space between phrases.

One way to practice this is by playing a simple chord change. Example: try alternating between C major and G major, strumming a half note on each chord. This helps develop a sense of control over your rhythm and timing.

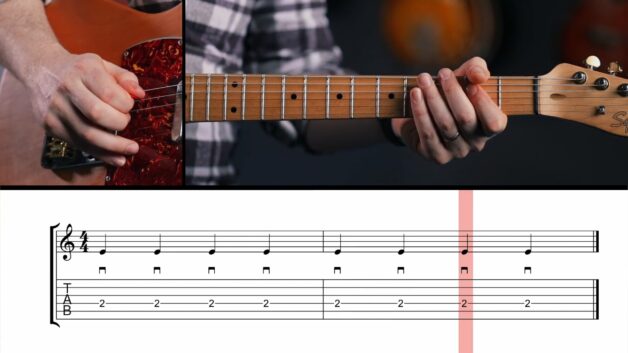
The Quarter Note: The Core of Most Rhythms

Quarter notes are where things start to feel more structured. Each quarter note lasts for one beat, meaning you play four notes per measure in 4/4 time. This is the fundamental pulse of most modern music. When you tap your foot to a song, chances are you’re following the quarter note beat.

One of the most common beginner mistakes is playing quarter notes inconsistently, either by rushing ahead or hesitating on certain beats. A great way to internalize quarter note timing is to practice with a backing track, starting slow and gradually increasing the tempo.

How to Improve Your Sense of Rhythm

Mastering rhythm is about more than just counting, it’s about feeling the pulse of the music. Here are a few practical exercises to reinforce your timing:

  • Clap and Count: Before picking up the guitar, try clapping along to a metronome, counting whole, half, and quarter notes out loud.
  • Foot Tapping: Always tap your foot while playing. It helps synchronize your body with the beat.
  • Play Along with Songs: Find simple songs that emphasize steady rhythm. Tracks like “Knockin’ on Heaven’s Door” (Bob Dylan) or “Let It Be” (The Beatles) are great starting points.
  • Use a Metronome: Start at a slow tempo and work your way up. Consistency is more important than speed.

Common Mistakes to Avoid

Even with practice, many beginners fall into a few common traps when learning note values:

  • Cutting Notes Too Short: Whole and half notes should be played for their full duration, don’t rush to the next note.
  • It’s essential to play while counting rhythmic formulas and tapping your foot to the tempo, whether with a metronome or to backing music.

Taking the Next Step

Once you’re comfortable with whole notes, half notes, and quarter notes, you’ll start to recognize them everywhere, from folk songs to rock ballads. The more you internalize these rhythms, the more naturally you’ll be able to lock into the groove of a song. Keep practicing with different tempos, experiment with backing tracks, and most importantly: listen carefully to the rhythm of the music you’re playing.

time signature by dan holton

Understanding Time Signatures (The Rhythm Behind the Music)

Finding Your Groove: Why Time Signatures Matter

Time signatures shape the way music feels, yet many beginner guitarists overlook them. Understanding how beats are structured helps you play with confidence, lock in with other musicians, and even compose your own music. If you’ve ever struggled to count along with a song or found some rhythms trickier than others, chances are the time signature played a big role.

The Basics: What a Time Signature Actually Means

Think of a time signature as a musical blueprint. It tells you two key things: how many beats are in each measure (the top number) and what kind of note gets the beat (the bottom number). The most common example, 4/4 time, means there are four beats in a measure, and each beat is a quarter note.

For beginner guitarists, 4/4 is your best friend. It’s everywhere. From The Beatles’ “Hey Jude” to AC/DC’s “Back in Black,” it’s the foundation of rock, pop, and more. But not all music sticks to this structure, and that’s where things get interesting.

Breaking It Down: Common Time Signatures You’ll Encounter

4/4 Time: The Universal Beat

Known as common time, 4/4 is the standard for a reason. You can count it naturally: 1-2-3-4, 1-2-3-4. This rhythm gives you flexibility. You can play steady downstrokes, syncopated funk patterns, or intricate fingerpicking arrangements without feeling rhythmically lost.

3/4 and 2/4: Waltzes and Marches

Move into 3/4 time, and the feel changes completely. Instead of counting to four, you feel a rolling 1-2-3, 1-2-3, perfect for waltzes and ballads. Think of “House of the Rising Sun” by The Animals or “Manic Depression” by Jimi Hendrix. Both use a three-beat structure to create a different kind of momentum.

Meanwhile, 2/4 time is sharp and punchy, often used in marches and traditional folk music. Johnny Cash’s “Folsom Prison Blues” is a great example. Its steady boom-chicka rhythm is driven by this compact, two-beat structure.

The Swing Factor: 6/8 and 12/8 Time

When you see an 8 on the bottom, things take on a swinging, triplet feel. 6/8 time means six eighth notes per measure, counted as 1-2-3, 4-5-6. It’s the rhythm behind songs like “Knights in White Satin” by The Moody Blues and countless blues ballads. 12/8 time works similarly but extends the pattern, allowing for longer, flowing phrasing.

For beginners, playing in 6/8 might feel tricky at first. The key is to listen for the underlying triplet groove. Many guitarists struggle because they instinctively try to count it like a standard four-beat rhythm. Practicing slow blues progressions can help develop a natural feel for these rhythms.

When Things Get Weird: Odd Time Signatures

Once you get comfortable with standard time signatures, you’ll start noticing music that doesn’t quite fit the usual patterns. 7/4 time is a great example. It feels slightly off-balance because it doesn’t resolve neatly in groups of two or four. Pink Floyd’s “Money” is a classic track that uses this time signature to create a distinctive groove.

Progressive rock, jazz, and experimental music often play with odd time signatures, shifting accents and phrase lengths to create unexpected rhythms. If you’re diving into bands like Rush or Dream Theater, be prepared to count carefully. It’s all about training your ear to hear the natural divisions.

How to Develop a Strong Sense of Time

Many beginners struggle with rhythm, but with practice, anyone can improve. Here are a few essential tips:

  • Count out loud while playing, it forces you to internalize the beat.
  • Use a metronome to develop consistency.
  • Clap the rhythm before playing it on guitar.
  • Listen to a variety of songs and try to identify their time signatures.
  • Practice switching between time signatures within a single exercise to improve adaptability.

Common Mistakes to Avoid

Many guitarists make the mistake of ignoring time signatures altogether, assuming they can “feel” the rhythm without really understanding it. While playing by ear is important, miscounting beats can throw off an entire song. Another common issue is rushing through odd time signatures, treating them like standard 4/4 phrases instead of respecting their unique structures.

Ready to Experiment with Time?

Mastering time signatures takes patience, but once you start noticing them in the music you love, everything clicks into place. Try playing along with different styles, from bluesy 6/8 shuffles to tricky 7/4 grooves, and see how they shape the feel of a song. Understanding rhythm will open up new creative possibilities and help you stay locked in with the band.

billy gibbons (ZZ top) guitar sound by julien bitoun

How to Get Billy Gibbons’ Guitar Sound: Beginner’s Guide

Billy Gibbons’ guitar tone is instantly recognizable: gritty yet clear, punchy yet smooth. Achieving this signature sound, famously showcased on ZZ Top’s classic track “La Grange,” can seem daunting for beginners, but it’s entirely possible with a little patience and guidance.

Key Takeaways:

  • Billy Gibbons’ tone blends distinctive guitar and amp characteristics.
  • Effective use of overdrive pedals and EQ can greatly enhance your sound.
  • Subtle reverb brings authenticity to your tone.

Understanding the Billy Gibbons Guitar Sound

Billy Gibbons crafted his unique sound by using guitars like a ’54 Stratocaster and his renowned ’59 Les Paul, affectionately called “Pearly Gates.” These guitars contributed distinctively different textures: one bright and cutting, the other thick and warm. For beginners who don’t own these vintage instruments (let’s face it, most of us don’t), a modern guitar with a humbucker pickup in the bridge position can serve as a versatile starting point.

Interestingly, achieving the Billy Gibbons guitar sound isn’t purely about gear but also about playing technique. New guitarists often struggle to find the right balance between aggression and precision. A common challenge is managing to strike the strings with enough force to produce rich harmonics without losing clarity. Practicing blues scales and riffs from well-known ZZ Top tracks like “Tush” or “Sharp Dressed Man” can significantly improve your control and confidence.

Dialing In Your Gear: Making the Most Out of Overdrive and EQ

One fundamental element of Billy Gibbons’ tone is a cranked, small tweed Fender amp. These vintage amps naturally break up at high volumes, creating a warm overdrive without harsh distortion. Most beginners (and their neighbors) appreciate a practical alternative: using an overdrive pedal. The MXR GT-OD, a tube screamer-style pedal, is a popular choice among guitarists aiming for that classic sound.

For effective settings, try setting the pedal’s gain around three o’clock to generate a saturated yet smooth tone. Keep the tone knob slightly darker (around ten o’clock) to mimic the warmth of vintage amps. But be cautious: beginners often set the gain too high, which results in overly compressed and muddy sounds. Remember, clarity is just as important as drive.

Another critical but frequently overlooked step is equalization. Billy Gibbons’ characteristic midrange punch and clarity are best reproduced by boosting frequencies around 800 Hz and 1.6 kHz. An EQ pedal, such as the MXR six-band EQ, gives you precise control over these frequencies. But use moderation, excessive EQ boosting can produce harsh and fatiguing tones.

A Touch of Reverb to Bring it Home

To get even closer to the recorded studio ambiance found in “La Grange,” adding a subtle amount of plate reverb is essential. Reverb should feel natural, never overwhelming. If you clearly notice the reverb effect, you’ve probably gone too far. Think of reverb as the final polish on your tone rather than a dominant sound.

Ready to Experiment?

Getting Billy Gibbons’ guitar sound is an excellent exercise in tonal exploration. Be patient, listen critically, and don’t hesitate to experiment. Every guitarist’s hands produce a slightly different tone, so find your version of this classic sound and enjoy the journey.

ritchie blackmore (deep purple) guitar sound by julien bitoun

How to Get the Legendary Ritchie Blackmore Guitar Sound

Capturing the legendary Ritchie Blackmore guitar sound, famous from tracks like “Smoke on the Water,” is a goal many guitarists aspire to. However, beginners often find themselves struggling with the nuances of tone control and equipment setup. The good news is, with some thoughtful adjustments and basic knowledge of guitar gear, you can get remarkably close to this iconic tone.

Key Takeaways:

  • Choose a Stratocaster-style guitar with a single-coil neck pickup.
  • Use Plexi-style amplifiers with carefully adjusted tone controls.
  • Incorporate a subtle plate reverb to replicate a studio environment.
  • Utilize a boost pedal to emulate Blackmore’s Echoplex-driven sound.

Understanding the Essential Gear

Ritchie Blackmore famously favored Fender Stratocaster guitars, which significantly shaped his bright yet robust tone. To replicate this effectively, select the neck pickup, as its single-coil construction provides the unique clarity and mild, bell-like resonance typical of Blackmore’s sound. It’s a common pitfall for beginners to use the bridge pickup or rely excessively on distortion pedals, losing that characteristic subtlety and definition.

Of course, Blackmore’s setup relied heavily on high-powered Marshall amplifiers, specifically Plexi models. These amps delivered their distinctive tone primarily through sheer volume, something impractical (and sometimes impossible) for modern bedroom practice. To navigate this challenge, you might consider using pedals like the Wayhuge Superlead. When using this pedal, start with controls set around the middle. Slightly roll back the tone knob to control excessive brightness. It’s a common issue with Strat-style guitars.

The Secret to Blackmore’s Sound: Boosting Correctly

Getting the right boost effect is critical and often misunderstood. Ritchie Blackmore utilized the Echoplex tape delay not primarily for echo effects, but for its preamp capabilities, effectively pushing his Marshall amp harder into natural overdrive. Emulating this accurately can be tricky, but pedals like the MXR GTOD can help bridge this gap.

Adjust the MXR GTOD’s output control moderately (around one o’clock) to enhance volume without introducing additional distortion. Keep the gain control at zero. Adjust the tone knob slightly brighter (around two o’clock) to add clarity, ensuring the notes stand out distinctly without becoming overly harsh. Incorrectly using a boost pedal (e.g., adding excessive gain) can muddy your tone and mask the subtle nuances characteristic of Blackmore’s technique.

Small Details, Big Difference

Adding a touch of plate reverb might seem trivial, but it significantly enhances your tone by adding depth and authenticity reminiscent of professional studio recordings. Historically, artists like David Gilmour and Jimmy Page similarly used subtle reverbs to add richness without overpowering their guitar tones. Remember, moderation is key: too much reverb can easily make your playing sound distant and washed out.

Additionally, beginner guitarists often overlook the importance of properly balancing volume, gain, and tone. Spend time gradually adjusting each knob to understand its effect on your sound. A precise setting can transform an average tone into something extraordinary, elevating your overall playing experience.

Now It’s Your Turn to Experiment

Understanding and replicating the Ritchie Blackmore guitar sound takes patience, experimentation, and attention to detail. Start with the guidelines above, but don’t hesitate to tweak settings to suit your specific setup and playing environment. With focused practice and thoughtful experimentation, you’ll gradually master this iconic tone.

ac/dc guitar sound by julien bitoun

How to Achieve the Legendary AC/DC Guitar Sound

AC/DC has earned a permanent spot in rock history largely due to their unmistakable guitar sound. This signature tone known as bright, punchy, and powerful without being overly distorted is often sought by beginners eager to capture the energy and excitement of classic rock. Yet, many newcomers find it tricky to nail down, especially when first starting out.

Key Takeaways:

  • AC/DC’s iconic tone blends rhythm clarity and lead dynamics.
  • Low-output humbuckers and classic Marshall amps are essential.
  • Plate reverb and careful use of gain pedals shape the solos.

Behind the Iconic AC/DC Guitar Tone

The instantly recognizable guitar sound of AC/DC is created by the interplay between two distinct guitar roles: Malcolm Young’s precise and rhythmic playing and Angus Young’s fiery lead lines. While Malcolm provided clarity and rhythm, Angus introduced dynamic solos that brought life to the songs. A crucial element to their sound is the use of low-output humbucker pickups, typically found on guitars like the Gibson SG and Gretsch Jet. These pickups produce a clean yet slightly aggressive tone, perfect for rhythm parts and solos alike.

Historically, the band relied heavily on vintage Marshall Plexi amplifiers. These amplifiers, known for their naturally bright tone and modest gain, created the crunchy, slightly distorted sound that defines songs like “Back in Black” or “Highway to Hell.” Although many beginners mistakenly believe that more distortion means a bigger sound, AC/DC’s powerful yet relatively clean tone proves otherwise. Understanding this subtle distinction is a key step toward replicating their iconic sound.

Gear Setup Essentials (Without Overcomplicating Things!)

When setting up your gear, remember simplicity often wins the day. Start by using an overdrive pedal configured at low gain levels by setting the drive around 10 o’clock. Keep your tone setting bright but not piercing, around the 1 o’clock mark. Many beginners make the mistake of pushing the gain too high, resulting in a muddy tone that lacks clarity and definition. Instead, aim for a clear, punchy tone that allows each note to ring out distinctly.

For a touch of studio authenticity, consider adding a plate-style reverb effect. Although it may seem minor, this type of reverb recreates the subtle depth heard on classic AC/DC records, particularly noticeable in quieter sections of songs. It’s a detail that beginners often overlook but one that significantly enhances your overall sound.

Boosting the Solo Tone: Angus Young’s Secret Ingredient

A well-known anecdote among guitar enthusiasts is Angus Young’s clever use of a Schaefer wireless transmitter. Not just for mobility on stage, but for its unique sonic qualities. This transmitter provided natural compression and a gain boost, subtly enhancing Angus’s solos with clarity and drive.

To simulate this effect without a wireless system, place a simple booster or volume pedal (such as the MXR GTOD) in front of your primary overdrive pedal. Keep the pedal’s gain low and output high, around the 3 o’clock position, allowing your amp to naturally saturate without excessive distortion. Adjust the tone to add just enough brightness to cut through the mix without overpowering the rest of your playing.

  • Use a moderate gain pedal setup, emphasizing clarity.
  • Plate reverb creates authenticity in studio-like sound.
  • Carefully boost solos to achieve Angus Young’s distinctive tone.

As you experiment with these settings, remember that finding the perfect tone involves gradual adjustments and patience. Paying attention to details like gain staging and tone settings helps develop your ear which is a critical skill in guitar playing. Avoid common pitfalls like excessive distortion and overly complex pedal setups, focusing instead on mastering the fundamentals. In doing so, you’ll not only get closer to the legendary AC/DC sound but also build a solid foundation for your guitar journey.

hank marvin (the shadows) guitar sound by julien bitoun

How to Capture the Iconic Hank Marvin Guitar Sound

For generations of guitarists, achieving the Hank Marvin guitar sound has become something of a musical rite of passage. Hank Marvin, lead guitarist of the influential band The Shadows, is famed for his distinctive, melodic tone. A clear, ringing sound that has influenced guitarists from George Harrison to Brian May. Yet, many beginners quickly discover it’s not as straightforward as plugging in a Strat and expecting instant magic.

Key Takeaways for Capturing the Hank Marvin Tone:

  • Use the second pickup position on a Stratocaster.
  • Combine compressor and EQ pedals to emulate a Vox amplifier.
  • Apply short slapback delay and spring reverb for authenticity.

Understanding Hank Marvin’s Distinctive Tone

Hank Marvin’s signature guitar sound was first immortalized in hits like “Apache,” and achieving it begins primarily with gear selection. While Marvin famously used Fender Stratocasters, beginners might overlook one critical detail: the pickup setting. The second position, blending the middle and bridge pickups, produces a bright yet smooth out-of-phase tone, essential for capturing his signature style.

Historically, Marvin’s guitar tone is inseparable from the legendary Vox AC-15 and AC-30 amplifiers. These amps delivered the crystal-clear, chime-like timbre that set his sound apart. But since a vintage Vox amp might be out of reach for beginners, it’s crucial to know how to replicate that tone through clever pedal combinations instead.

Dialing in Your Pedals: The Essentials

For guitarists new to tone-shaping, knowing precisely how to combine pedals to mimic Marvin’s tone can be daunting. However, using two types of pedals carefully will significantly bridge the gap. First, a compressor pedal (like the MXR Super Comp) smooths your dynamics, subtly squashing notes to replicate the natural tube compression of vintage Vox amps.

Secondly, employing an EQ pedal to boost the treble frequencies will help recreate the sharp, clear highs synonymous with Marvin’s playing. One common beginner error here is overdoing the EQ. It’s easy to produce a harsh, unnatural sound. A good tip: make subtle adjustments, gradually boosting the high frequencies until you hear clarity without piercing tones.

Adding the Finishing Touches (Slapback and Reverb)

Hank Marvin’s recordings featured a distinctive “slapback” delay which is a short, single echo clearly audible in tracks like “Wonderful Land.” Beginners often struggle to set delay times correctly, inadvertently creating an overly muddy or rhythmic delay. A practical approach is to set your delay pedal (such as the MXR Carbon Copy) with a very short delay time, minimal regeneration (feedback), and a prominent but controlled mix. Experimenting with these settings using familiar Shadows tunes can provide immediate feedback on your progress.

Similarly, Marvin’s preference for subtle spring reverb adds that vintage ambiance. Be careful here: too much reverb can quickly wash out your clarity, especially during faster passages. Instead, aim for a balanced, moderate setting that complements, rather than dominates, your core sound.

Common Mistakes and Teaching Tips

Many beginners assume gear alone defines the Hank Marvin guitar sound. Yet even with perfect equipment settings, technique plays a significant role. Marvin’s playing style is precise and deliberate; each note rings out clearly. Beginners often rush, losing the crucial definition. A teaching tip is to practice slowly, emphasizing note clarity over speed initially.

Additionally, remember the importance of pick control: too heavy-handed, and you’ll lose the subtle nuances of Marvin’s gentle attack. Regular practice with mindful attention to picking technique can significantly improve your sound over time.

By thoughtfully combining gear and mindful practice, beginners can genuinely capture the essence of Hank Marvin’s iconic guitar tone. Keep experimenting, stay patient, and let your ears guide you towards the perfect vintage sound.

David gilmour (Pink Floyd) guitar sound by julien bitoun

How to Recreate the David Gilmour Guitar Sound: Starting with Comfortably Numb

Key Takeaways:

  • Recreate Gilmour’s iconic tone using a neck single-coil pickup and a fuzz pedal with moderate gain.
  • Focus on touch sensitivity and dynamic control, not just effects.
  • Subtle delay and modulation complete the atmospheric lead sound.

Getting Into Gilmour Territory: Without the Million-Dollar Rig

Ask any guitarist about legendary lead tones, and David Gilmour’s solo in Comfortably Numb will almost always come up. It’s not just the gear—it’s the feel, the sustain, the richness. And yes, part of that magic came from his famous Black Strat and a studio full of vintage gear. But the real starting point for beginners? Understanding how each component of that tone works together.

You don’t need a rare Hiwatt amp or a boutique pedalboard to chase the David Gilmour guitar sound. What you do need is a basic grasp of tone-building, and that’s exactly what this course introduces. Many beginners struggle with this early on, not because they lack technique, but because they don’t yet know how to listen to their tone.

Foundations First: The Neck Pickup and the Amp Drive

The tone starts with the neck pickup. Gilmour’s lead tones have that round, vocal-like quality, and the neck single coil is essential for that warmth. If you’re playing a Strat-style guitar, start there.

Next is amp choice, or at least how you simulate it. Gilmour used a Hiwatt DR-103, which delivers a clean yet robust British crunch. In this lesson, a pedal-based preamp (the Wavetouch Superlead) takes its place, dialed back just enough to warm up the signal before the fuzz kicks in. That’s a smart trick: adding fuzz to a clean amp often results in a harsh, fizzy tone. Feeding it into a mildly driven signal gives you that controlled, singing sustain.

A common mistake? Cranking the gain too high too soon. That might feel satisfying at first, but it often muddies your playing. Gilmour’s tone isn’t about maximum distortion, it’s about nuance.

Fuzz, Delay, and Modulation: Layering the Classic Sound

The backbone of this tone is a Big Muff-style fuzz. Here, a Way Huge Swollen Pickle is used, set conservatively: sustain just below noon, filter around 11 o’clock for a darker tone. These details matter. Many beginners overdo it with fuzz, resulting in a wall of noise they can’t quite control.

You’ll also learn how to add just enough delay for depth. Tape echo was part of Gilmour’s setup, and in this lesson, a Carbon Copy delay gets close. Longer delay times, subtle mix and feedback, these settings help you find that floating, spaced-out ambiance without overwhelming your notes. A light modulation, like the MXR Micro Chorus, adds movement, but it’s not the star of the show.

Interestingly, the modulation pedal is placed before the amp drive here. That’s a nod to older signal chains, where effects went straight into the amp. Modern convention places modulation after distortion, but doing it the vintage way creates a different flavor, slightly murkier, but more authentic to the era.

Teaching Tips: What Beginners Should Watch Out For

  • Listen more than you tweak. It’s tempting to chase settings, but learning to hear how each element affects your sound will serve you longer.
  • Avoid stacking too many effects at once. Beginners often try to replicate pro tones with too much gear and not enough restraint.
  • Practice with slower bends and vibrato. Gilmour’s sound is as much about how he plays as what he plays.

Also, be patient with fuzz. It’s not the most forgiving effect, especially when it comes to precision. Play slowly at first. Focus on articulation and dynamics. Think of lead parts like the intro to Shine On You Crazy Diamond or the outro solo from Time. It’s less about speed and more about space.

Ready to Build the David Gilmour Guitar Sound?

If you’re just getting started with tone-building and want to understand how legendary sounds come together, this is a solid place to begin. Learn how to mix clean crunch, fuzzy sustain, and ambient depth to create tones that truly sing. You’ll explore the essentials of the David Gilmour guitar sound, one step at a time, and discover how your own playing can evolve in the process.